Create an Amazing Nursery Room with Beach Wall Decals!
Brian Peters of St. Louis, MO, used istickup™s beach wall decals to create an amazing beach themed nursery room where his baby can enjoy the summer sun all year long. He also put together a before and after set of photos so that we can see step-by-step how he designed and crafted this fantastic room!
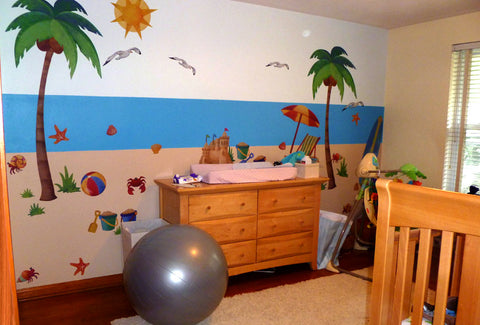
Here's the final look of his nursery room:
• Paint Brush and a Paint Roller
• Painter's Tape
• istickup™ Beach Wall Decals


Step 2: Grab your painter's tape and make a straight tape line across the middle section of your wall. Do the same at the base of the wall. This area will be your sand :) Paint this section using your tan paint and make sure you let it dry overnight.
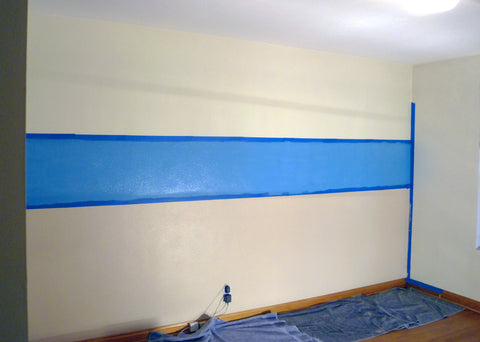
Step 3: Keep the line of tape that you used for the top portion of your sand in place. Now add another tape line approximately 2 feet up from that (perfectly parallel). This middle section will be your ocean. Using your blue, ocean-colored paint, paint this section and allow it to dry overnight.

Step 4: Keep the line of tape that you used for the top portion of your ocean in place. Now tape off the top portion of your wall. This area will become your sky. Using your sky blue paint, paint this section and leave it to dry overnight.
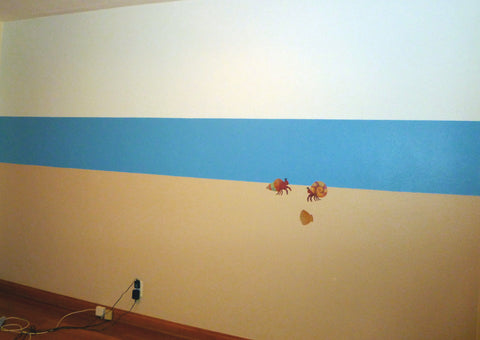
Step 5: Remove all the painter's tape that you used to mask off your sections. Your walls are now ready for placement of your beach wall decals!

Step 6: Start peeling and placing your Beach Wall Stickers! This is the fun part! You can place, remove, and re-arrange your stickers as many times as you like. istickup™s amazing stickers will never damage your walls or leave any residue, so you can do this until you are 100% happy with the way it looks. Now sit back and enjoy summer all year round!
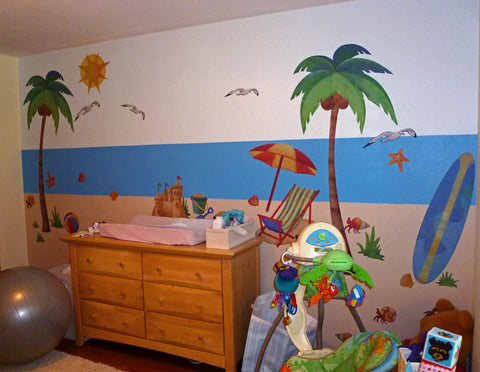
Note: Brian also added a few seagulls from our Ocean Wall Decal theme room to add even more fun!
--------------------------------------------------------------------------------------------------------------------------------
I got a chance to ask Brian a few questions about his amazing Beach Themed Nursery creation:
The room before was just standard (4) yellow walls and just plain. By using the iStickup decals, we ceratinly brought "life" to the room! Now we cant wait till the baby comes along and actually use the baby room!
Were you and your spouse happy with the end result?
YES YES YES, we were absolutely happy with the outcome and final results! It is really cool, when you look at the wall mural or take a picture from the side (or angle) the wall actually takes a rather 3D like effect, as if you are actually staring out into the ocean! Really cool!
How long did it take you to put up your stickers?
The painting of the wall (the background) took basically three days. In terms of the decals, that really only took minutes! The hardest part was the "good" squab-ling between my wife and I as to where to actually place the stickers...I was actually like a little kid, I could not wait to place another decal on the wall...I had to set boundaries and allow my wife to contribute!!
Do you have any tips for others on designing an imaginative room like this?
My advice to others, GO WITH iSTICKUP!!! My wife and I researched online for weeks before actually pulling the trigger and purchasing your products. We found another wall mural/decal type company, however they were approximately 3x higher in price. We were also on the fence about "me" hand painting the mural, by the time you add up all the TIME as well as cost of all the various cost of paints needed....istickup™ was a no brainer!! To the general public and consumer-rest assured- the materials and decals are made of great quality product and the decals actually "STICK" to the wall, and the ease of replacing and/or moving the decal objects are awesome and they still maintain their stick!
Thanks so much for everything Brian! Your walls look great and we are proud to have you as an istickup™ customer! If you are looking to duplicate Brian's creation, you can purchase our Beach Wall Decals Here.
I like what you guys are up also. Such intelligent work and reporting! Keep up the excellent works guys Ive incorporated you guys to my blogroll. I think itll improve the value of my website . The part can never be well unless the whole is well. by Saul Bellow.
Precisely what